Interior Concepts is an Interior Decorating firm which provides Soft Furnishing Services mostly for Residential Spaces. Our Services fall under two different Sub-brands, namely Softies and Decor Clean.
While Softies provides a complete decor package from design stage to production ,and finally to installation,Decor Clean undertakes the cleaning of Decor Items such as curtains,sofas,carpets and also handles one-off janitorial cleaning services of both residential and non-residential spaces.
Interior Concepts also undertakes complete Home Make-Overs for Interior Spaces |
Monday, 22 August 2011
2 Simple Methods To Add All Your Friends To A Facebook Fan Page Or Group
Step 1: Enable your Bookmarks Toolbar (if it isn’t already)
1a: Right-click the menu bar and make sure there is a check next to “Bookmarks Toolbar”
Step 2: Add a new bookmark to the toolbar
2a: Right-click the Bookmarks Toolbar and select “New Bookmark…”
Step 3: Edit the bookmark properties
3a: Type a short name for your bookmark (shorter is better!)
3b: Paste the following JavaScript snippet into the “Location” setting
3c: Click the “Add” button (you should have noticed your newly made button by now)
javascript:elms=document.getElementById('all_friends').getElementsByTagName('li');for(var fid in elms){if(typeof elms[fid] === 'object'){fs.click(elms[fid]);}}
That’s all there is to it! You can go test it out now. If you find that this method still no longer works for you, then Facebook is up to its silly little games again. They seem to roll-out changes to people at different times. For me, this method is still alive and well. If you can’t use this method, here’s another simple alternative for you FireFox users:
Step 1: Install the Greasemonkey extension (found here)
Step 2: Install this Greasemonkey script (found here)
Yup, simple as clicking the install buttons found on each of those sites. If you’ve followed all the steps correctly, you should now have 2 working methods to select all your friends on Facebook. Happy inviting!
As you may have noticed, I’ve only explained how to use these methods using FireFox instead of Internet Explorer, Opera, Safari, or Google Chrome. While they may work in alternative browsers, I haven’t tested. The only browser I use is FireFox. Please feel free to tryout the other browsers and let me know how it goes for you. The bookmark method should be cross-compatible with all browsers that support JavaScript. As far as the Greasemonkey method goes, there may or may not be Greasemonkey plugins/extensions for other browsers. If there is, I can’t guarantee my script will work on them. Anyways, if you try other browsers, let me know how it goes.
If either of these methods helped you, or if you seem to be having some sort of issue with them, please post in the comments below to let me know. Thanks for reading!
ONLY the Greasemonkey script works now. You can install the Greasemonkey script as a Google Chrome extension if you don’t use FireFox…
I had a video demo of this script in action, but Facebook deleted my account and I no longer have the video. For whatever reason any new account I make, at least the ones with my identity, get deleted. Facebook officially hates me and I no longer partake in any Facebook activities, for the time being. Thanks for all your support, it was fun while it lasted.
Thursday, 18 August 2011
How to create composite image of 2 photos side-by-side
I have shown how to display 2 images side by side using the HTML table tag <table> but because a blogger asked to display a particular pair of photos side by side which actually turned out to be a single composite picture of 2 photos side by side, I am going to illustrate how this alternative method do displaying 2 photos side-by-side using my favorite free Irfanview photo editor.
First I am going to upload 2 photos of some trishaws (pedicab, bikecab, cyclo, becak, or rickshaw or in my country, becha) taken during my holidays in idyllic Terengganu displayed below using HTML table tag
:
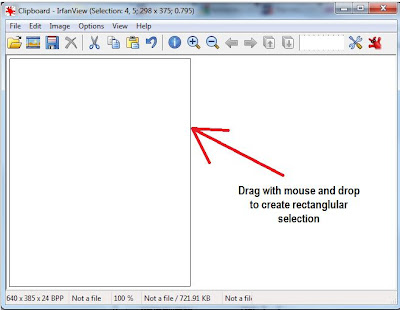
Say, supposed you are HTMLphbic, meaning you hate HTML, here is how to make a single composite image of 2 photos side-by-side. First, open Irfanview or similar photo editors. I then go to Menu > Create New (Empty) Image (see screen shot below) and create an empty image, say, 800x500. Using the mouse, drag and drop to select a rectangle roughly proportional to the size of the photo (see screen shot below, red arrow to highlight selected rectangle):
Screen shot 2
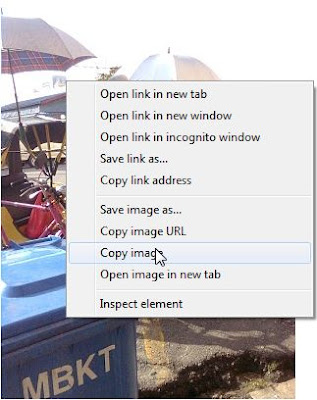
Now go to one of the photo, right-click on the photo and select COPY IMAGE to copy into clipboard (see screen shot below):
Screen shot 3
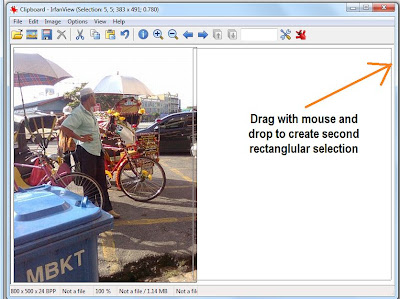
Now go to the first image that you want in the composite picture, either right-click on the image and select COPY IMAGE or go to the Menu, click EDIT > COPY IMAGE to copy image into clipboard. Now go back to the created image with the selected rectangle (screen shot 2), go to MENU > EDIT > PASTE and the first photo will be pasted into the selected triangle just like the screen shot below:
Now drag and drop to create the second selection (see screen shot above) and copy-paste the second photo and you will end up with the single composite photo with 2 images side-by-side:
How to put a copyright notice into your photo
Another way of protecting your photo is to put a copyright notice on the photo itself. For example, the photo below is copyright of Tourism (but can be used for promotion of tourism to Malaysia. This year is Visit Malaysia year and will be a good time to visit Malaysia as many programs have been planned for visitors. See Guide to Malaysia) and you can see a copyright notice at the bottom right corner of the photo:
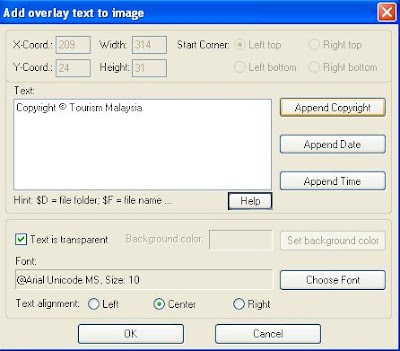
This is how I did it. I use the free and very good Irfanview. I suggest you google "Irfanview download" and install a copy of it in your computer. I first open the photo with Irfanview, and then using the mouse, click and drag a rectangle in which I want the copyright notice to be placed. Then in the menu bar of Irfanview, I click "EDIT > INSERT TEXT INTO SELECTION" and a pop-up will appear for you to chose the font, font size, type in the notice, even incorporate a © character (which I forgot) by clicking on the "Append copyright" button. See screenshot below:
and if everything is satisfactory, click OK. If the result is not what you want, you can always click EDIT > UNDO and repeat the process until you get the result you want. Then save the photo and upload it to your computer.
However, please note that there is nothing to prevent a person from cropping out the bottom bit of the photo where the copyright notice is and use the slightly smaller photo.
Really, the only way you can prevent people from copying your photographs is not to put them on the web in the first place.
Using Irfanview photo editor for Blogger blogs
What and how do I use Irfanview for my blogs? Well, very frequently, I need screenshots to better explain what I want I have in mind. (I refer to screenshots below because I mainly work with screenshots. The same methods apply to photos, etc.) To do that, in the particular page, I press the key Printscreen, open Irfanview, click Edit in the menu bar and choose Paste, and the screen image appear in its editor window. With this method, the cursor will not be displayed. If I want the mouse cursor to be shown on a particular spot to draw attention to it, I first go to the screen I want pasted, go to Irfanview, press C, and a pop-up will appear. I select the relevant options, make sure "Include mouse cursor" is ticked, click start and I will be taken to the previous screen. I then press ctrl+F11 (the key is configurable, but F11 is the default. It can be changed but I have no reason to change it), and I will be taken back to Irfanview with the screen in the image editor window with the mouse cursor in the spot where I last left it.
I can also highlight a spot by drawing a circle around it. Unfortunately, Irfanview does not have that feature. For that, I have to use Paint which comes with Windows (under Accessories)
Cropping
If I want only a particular section of the screen of the screen to be included, I drag and drop the mouse in that section. a broken-line box will surround the section. I click on Edit in the menu bar and select "Crop selection" and the rest of the screen will disappear, leaving only the section. I then save the file, usually in jpg format (there is a huge selection of formats to choose from in Irfanview). I then upload the screenshot into the post.Add text
If I want text to be displayed in certain section of the screnshot, I drag and release to highlight that section of the screenshot I want the text to be displayed, click Edit in the menu bar, select "Insert text into selection", a pop-up will appear with a box for me to type in the text. There will be other options such as choose font, alignment left, center or right, etc. When I am finished, I just click OK and the text will appear in the screenshot.Highlighting particular section of the screen with Paint
When I want to draw attention to certain section of the screen, such as putting a circle or a rectangle around a section of the screenshot, it unfortunately can't be done in Irfanview. I first save the file. I then open Paint available in the Accessories section of Windows. I open the file in Paint. I first select the color of the ellipse I want it to be, usually red by clicking on the square of color in the palette at the bottom of Paint. Then I select the icon for ellipse in the toolbar on the left side of Paint. I then drag and drop the mouse over the section I want to highlight, and an ellipse will surround that section. To see an example of a screenshot with a portion of it highlighted by a red ellipse, surf over to Generating simple graphic header using Irfanview photo editor (click "BACK" button to return to this page). If I am not happy, I click Edit in the menu bar and select Undo, and the ellipse will disappear. I repeat again until I am satisfied. I then save the file (the default format in Paint is bmp. I normally change it to jpg). The screenshot is then ready for upload to the post.Resizing image size
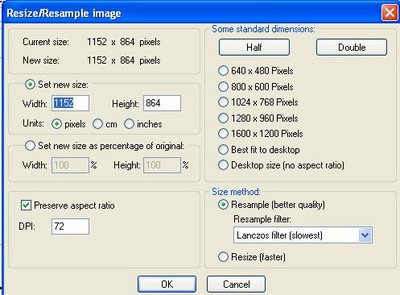
Frequently, we have to resize images so that they will fit into the space we want them to display, etc. This can very easily be done in Irfanview. In Paint (which I seldom use) the choices are to resize in percentage, which can be problematic if you need the width to be in exact pixels. In Irfanview, just click Image in the menu bar and select Resize/resample, and a pop-up will appear. There are many choices (pixels, cm., inches, percentage). You can see the choices in the screenshot below (click to enlarge):If, for example, you want to resize the image so that the width do not exceed the width of the column, enter the pixels into "width", leave the "height" alone and tick "Preserve aspect ratio". The height will be automatically set to keep the image from being distorted. You can then either save the image to be uploade in its original size or just use the figures in the width="" height="" attributes in the <img> tag. (Note: if you are using the <img> tag, you only need to enter the attribute width="X". If the height attribute is left out, the resulting image will automatically be scaled so as to keep the aspect ratio constant).
Save or convert picture into many different formats
With Irfanview, you can save or convert your picture into very many different formats. I am using the Irfanview 3.98 version. There are already a few upgrades which I didn't bother with, and I wouldn't know if there had been any changes in the number of file formats. For the version I have, there are altogether 19 choices which I list below:Irfanview 3.98
bmp Windows bitmap
ecw Enhanced compressed wavelet
emf Enhanced Windows metafile
fsh EA Sports format
gif Compuserve gif
ico Windows icon
jp2 JPEG 2000 format
jpg JPEG files
jpm JPM format
ldf LuraDocument format
lwf LuraWave format
pcx Zsoft Paintbrush
pbm Portable bitmap
pgm Portable graymap
png Portable Network Graphics
ppm Portable pixelmap
raw RAW image data
tga Truevision Targa
tif Tagged image file format
The ico format will be useful if you intend to add a Favicon for your blog.
Map showing location of visitors that visit your blog
A blog reader wants a map in his blog sidebar to show locations of visitors to his blog like the one you see at the bottom of the first left sidebar of Career and you (note: that blog is a demo blog with not many visitors so you may not see many dots on the map, but will be different if your blog has lots of visitors).
To install a similar gadget for your blog, an easy option will be to go to ClustRmaps, type or copy-paste your blog URL, type in your email address and click [Make my map] and the codes for your map will be generated.
Sign into your Dashboard > Design >Add A Gadget> HTML/Javascript gadget
Paste the codes into a HTML/Javascript gadget, save, drag the gadget to wherever you want the map display, save and it is done,
Tabs - differences between new xml LAYOUT template and old classic template
For a blog reader whose POSTING tabs have only NEW POST an EDIT POSTS sub-tabs with no EDIT PAGES sub-tabs, his blog probably is still using the old classic template and not the new xml LAYOUT (now called DESIGN) template.
If so, you can see from the DASHBOARD that the DESIGN tab will be missing and in its place will be the TEMPLATE tab highlighted in red (see screenshot below):
Those with the new xml LAYOUT (now called DESIGN) will see DESIGN tab (highlighted in red in the screenshot below) and not TEMPLATE as in the above screenshot:
Update: If for any reason you want to use the old classic template, you can still do so irrespective of whether your blog initially started with the old classic template or your blog is a brand new blog. All you need to do is to go to the Dashboard, click the DESIGN (previously LAYOUT) tab, then Edit HTML tab and at the bottom you will see under Old Templates:
Layout Templates (Launched 2006)
Select Layout Template
Classic Templates
Revert to Classic Template | View Classic Template
Click Revert to Classic Template and your blog will be using the old classic template.
Cannot access Blogger account - what to do
===================
-->
If for whatever reasons you cannot access your Blogger account, go to Blogger.com and click the "Cannot access your account?" link
and you will be presented with 2 choices:
1. Lookup blogspot URL (input the URL of your blogspot.com blog)
or
2. Lookup email (enter your email address if your blog is not hosted on Blogspot (custom domain) or can't remember blog URL or don't have a blog
The next step will be to check your email address or addresses and follow the instructions there. You will be given a hint, example check gmail.com account or check yahoo.com as shown in screen shot below:
BTW it is good to update your Google account such as giving a handphone number to recover your account in case you don't have other means to recover your account in which case an SMS will be sent to your handphone.
3 die of rare brain infection from amoeba in water
- Play Video
- Video: Health Watch: Warning For Those Who Swim In Warn, Fresh WatersCBS 3 Philadelphia 2:04 | 36970 views
- Article: Amoeba blamed for swimming death in FloridaReuters - Mon, Aug 15, 2011
Those cases are consistent with past cases, which are usually kids — often boys — who get exposed to the bug while swimming or doing water sports in warm ponds or lakes.
The third case, in Louisiana, was more unusual. It was a young man whose death in June was traced to the tap water he used in a device called a neti pot. It's a small teapot-shaped container used to rinse out the nose and sinuses with salt water to relieve allergies, colds and sinus trouble.
Health officials later found the amoeba in the home's water system. The problem was confined to the house; it wasn't found in city water samples, said Dr. Raoult Ratard, Louisiana's state epidemiologist.
The young man, who was only identified as in his 20s and from southeast Louisiana, had not been swimming nor been in contact with surface water, Ratard added.
He said only sterile, distilled, or boiled water should be used in neti pots.
The illness is extremely rare. About 120 U.S. cases — almost all of them deaths — have been reported since the amoeba was identified in the early 1960s, according to the Centers for Disease Control and Prevention.
About three deaths are reported each year, on average. Last year, there were four.
There are no signs that cases are increasing, said Jonathan Yoder, who coordinates surveillance of waterborne diseases for the CDC.
The amoeba — Naegleria fowleri (nuh-GLEER-ee-uh FOWL-er-eye) — gets up the nose, burrows up into the skull and destroys brain tissue. It's found in warm lakes and rivers during the hot summer months, mostly in the South.
It's a medical mystery why some people who swim in amoeba-containing water get the fatal nervous system condition while many others don't, experts say.
But the cases that do occur tend to be tragic, and there's only been one report of successful treatment.
"It's very difficult to treat. Most people die from it," Ratard said.
watch video here or right beside here
get free books here
The Help
Kindle 3G, Free 3G + Wi-Fi, 3G Works Globally, Graphite, 6" Display with New E Ink Pearl Technology - includes Special Offers & Sponsored Screensavers
Shotgun
Hurricanes in Paradise
Dream With Me
Kindle, Wi-Fi, 6" E Ink Pearl Display - includes Special Offers & Sponsored Screensavers
Wednesday, 17 August 2011
How to Add Facebook Like Box On Blogger's Blog
Look at the box above, it is Facebook Like Box for Make Money From Blog With Google Adsense
Before you create a Facebook Like Box, you have to create your Facebook Fan Page 1st.
Create Your Facebook Like Box
You can create Facebook Like Box quite easily using the official link to "Facebook Like Box". After Facebook Like Page creation site is loaded, you will need to fill in:1. Where is Facebook Page URL
Your Facebook Page URL can be obtained from your Facebook Fan Page. All you need to do is to login to your Facebook Fan Page account and copy the URL of your Facebook Fan Page. The URL of your Facebook Fan Page is the one after your Login to your Facebook Fan Page account. Look at the picture below to learn how to copy your Facebook Fan Page URL.
2. How to Copy and Paste Facebook Fan Page URL
Copy your Facebook Fan Page URL and paste to the Facebook Like Box Creation page just like the picture below:
The Facebook Fan Page Creation Settings Explanation
1. Facebook Fan Page URL: Your Facebook Fan Page URL2. Width: Adjust the width of your Facebook Like Box.
3. Color Scheme: Facebook provides "light" and "dark" color scheme, normally I like to use "light" color scheme.
4. Show Faces: This will show the people who like your blog.
5. Border color: change the border color of Facebook Like Box
6. Stream: If this is enabled, Facebook Like Box will show your blog post in the box.
7. Show Header: If this is enabled, your Facebook Like Box will contain a header "Find us on Facebook".
Your Facebook Like Box Is Almost Done
In my Facebook Fan Page above, I have disabled the "Stream" and "Header". I chose "light" color scheme, the "width" is 292px and I chose "Show Faces" to show the faces of people following Earn Money From Blog 2.0.
Click "Get Code" and paste to your blog at the desired location. You will encounter another problem - The Height of the Facebook Like Box Problem.
A Fix For Facebook Like Box Height Problem
After you click "Get Code", you will see the picture as shown below. I would suggest you to copy the "XFBML" codes because it is easier to edit the Facebook Like Box height.The Original XFBML Codes will look like the codes below
<div id="fb-root"></div><script src="http://connect.facebook.net/en_US/all.js#xfbml=1"></script><fb:like-box href="YOUR FACEBOOK FAN PAGE URL" width="292" show_faces="true" border_color="" stream="false" header="false"></fb:like-box>
In order to fix the Facebook Like Box problem, you need to change the original Facebook Like Box codes to the codes as described below:
The codes to edit Facebook Like Box Height
<div id="fb-root"></div><script src="http://connect.facebook.net/en_US/all.js#xfbml=1"></script><fb:like-box href="YOUR FACEBOOK FAN PAGE URL" width="292" show_faces="true" border_color="" stream="false" header="false" height="265"></fb:like-box>
I have added height of the Facebook Like Box as 265px in the the new codes above. You can change the height according to your preference.
Note:
Make sure you change the "YOUR FACEBOOK FAN PAGE URL" to your own Facebook Fan Page URL.
How to Add The Facebook Like Box Coding to Blogger's Blog
Since you have perfected the Facebook Like Box codes, then it is time to copy the codes and paste into your Blogger's blog.1. Login to Blogger's Accont and go to Dashboard > Design > Page elements
2. Click "Add a Gadget" and Select "HTML/Javascript".
3. Paste the Facebook Like Box codes into the "HTML/Javascript" text area.
4. Save.
5. Move the gadgets around until you found the location you like most.
6. Save your blog design by clicking "Save" on the top right corner of the "Design" page.
Done. You have successfully added Facebook Like Box to Your blog.
How Facebook Can Become a Money Making Machine
Social networks have truly come of age in the last year. No longer viewed as lonely outposts for youthful college slackers, the reach of these platforms has grown exponentially. Today, more than two-thirds of the world’s Internet users visit the social networking sites that reel in billions of eyeballs every 24 hours.
Yet, despite the staggering growth of social networking, determining how to monetize social media platforms remains a tough code to crack for even the savviest of companies. As such, identifying new revenue models will be instrumental in kicking off the next cycle of the social networking phenomenon in 2010.
If Anyone Can Do It, Facebook Can
Facebook, social networking’s acknowledged leader, has surpassed every platform on the market today, corralling more than 350 million unique users globally. If any social network is poised to design a winning formula for successful revenue streams in 2010, it’s Facebook. CEO Mark Zuckerberg has set an aggressive agenda for the company, publically stating that he “expects social networks to become as essential as web browsers and operating systems,” and he has set the lofty — yet entirely realistic — goal of 1 billion users worldwide.
In the less than five years since it expanded beyond scholastic audiences, Facebook has not only grabbed the lion’s share of users, it has engaged them like no other platform on the Internet. The average Facebook user visits the site at least once a day and spends an astounding 55 minutes engaging friends and family –- statistics that another Zucker (Jeff) would probably kill for over at NBC.
While translating such popularity into dollars and cents isn’t easy –- especially in an industry whose users have grown accustomed to getting something for nothing –- Facebook could potentially provide a monetization template that would revolutionize social networking as we know it.
The Next Level of Advertising Revenue
Advertising has traditionally provided the simplest means of generating revenue. PricewaterhouseCoopers reported in October that Internet advertising revenues totaled $10.9 billion for the first half of 2009. It’s been estimated that Facebook alone took in $435 million of that total. But for a site with nearly half a billion users, a quarter of which spend more time within the network than watching television, these numbers represent just the beginning potential.
First, Facebook needs to admit to itself that it is in the business of selling ads. By better managing its advertising network, intelligently expanding its marketing options, and developing workable social ads that leverage the branding power of friends and connections, Facebook can begin to capture its rightful share of online ad revenues. The final piece is to increase awareness and understanding of Facebook ads among corporate decision makers.
For example, every executive in America today understands the value of purchasing Google ads –- and that didn’t happen by accident. Google understood that what caused it to dominate online search wasn’t going to ultimately position the company as a global corporate powerhouse valued at nearly $200 billion. Google’s aggressive marketing, communications, and lobbying shops have worked to ensure every ad buyer, political campaign, marketing executive, and public relations flack knows the value of the service and has direct and easy access to account executives who explain the much worshiped “ROI” Google ads provide.
Today, Facebook stands on the precipice Google inhabited just before it became a top money-maker. By taking a page from the Google playbook, and aggressively marketing — and explaining — its power to influence buying decisions, Facebook ads could become as essential to 21st Century marketing as the yellow pages were in the 20th Century.
E-Commerce – Stop Sending Customers Away
The launch of Facebook as a true e-commerce site holds immense potential as a business solution and could forever change the way we shop. Online purchases through the first three quarters of 2009 totaled $98.3 billion according to the Department of Commerce. For the majority of companies selling products online who are also engaged on Facebook, opening Facebook fully to direct e-commerce transactions will dramatically change how businesses advertise and how consumers buy goods online.
Consumers and companies would flock to a Facebook storefront for one simple reason: We do everything else there. Imagine an integrated, one-click solution whereby your friends see your recent purchases (because you were incentivized by the brand to share your information) in their feed and are able to simply point, click, and purchase the same item.
With a few adjustments, companies can make timely offers of birthday gifts for friends, travel arrangements for event items, or the latest music from favorite artists –- and make the sale without forcing the user to leave Facebook or put in new login information.
Rather than driving their 350 million users away from the platform to “close the deal” with retailers and purchase the item on an external platform, Facebook could benefit financially by charging companies a percentage of sales, a fixed rate to have a storefront, or from increased advertising opportunities.
Premium Subscription Options
Finally, whether users like it or not, Facebook will do itself a long term disservice if it does not consider premium subscription options. Users (whether they are corporations or teenagers) are amenable to paying for even the simplest features and functionality, as evidenced by the success of Facebook gifts.
Nothing good in life is free. It’s a stark, mature reality that Facebook (and its users) need to face in 2010. By leveraging economies of scale, Facebook can churn a sizable profit without alienating users. Would you pay one dollar a month to share higher-resolution photos or upload higher-quality or longer videos? Last month, 2.5 billion photos were uploaded to Facebook. Even if only a quarter of the site’s active users opted for premium options, this one change would generate more than $1 billion in annual revenues.
Improving advertising, developing an e-commerce platform, and adding subscription services will not only generate the revenue necessary to make the transition from highly adopted to highly profitable, it will open revenue streams — as Google did before — for the next generation of digital developments.
Yet, despite the staggering growth of social networking, determining how to monetize social media platforms remains a tough code to crack for even the savviest of companies. As such, identifying new revenue models will be instrumental in kicking off the next cycle of the social networking phenomenon in 2010.
If Anyone Can Do It, Facebook Can
Facebook, social networking’s acknowledged leader, has surpassed every platform on the market today, corralling more than 350 million unique users globally. If any social network is poised to design a winning formula for successful revenue streams in 2010, it’s Facebook. CEO Mark Zuckerberg has set an aggressive agenda for the company, publically stating that he “expects social networks to become as essential as web browsers and operating systems,” and he has set the lofty — yet entirely realistic — goal of 1 billion users worldwide.In the less than five years since it expanded beyond scholastic audiences, Facebook has not only grabbed the lion’s share of users, it has engaged them like no other platform on the Internet. The average Facebook user visits the site at least once a day and spends an astounding 55 minutes engaging friends and family –- statistics that another Zucker (Jeff) would probably kill for over at NBC.
While translating such popularity into dollars and cents isn’t easy –- especially in an industry whose users have grown accustomed to getting something for nothing –- Facebook could potentially provide a monetization template that would revolutionize social networking as we know it.
The Next Level of Advertising Revenue
First, Facebook needs to admit to itself that it is in the business of selling ads. By better managing its advertising network, intelligently expanding its marketing options, and developing workable social ads that leverage the branding power of friends and connections, Facebook can begin to capture its rightful share of online ad revenues. The final piece is to increase awareness and understanding of Facebook ads among corporate decision makers.
For example, every executive in America today understands the value of purchasing Google ads –- and that didn’t happen by accident. Google understood that what caused it to dominate online search wasn’t going to ultimately position the company as a global corporate powerhouse valued at nearly $200 billion. Google’s aggressive marketing, communications, and lobbying shops have worked to ensure every ad buyer, political campaign, marketing executive, and public relations flack knows the value of the service and has direct and easy access to account executives who explain the much worshiped “ROI” Google ads provide.
Today, Facebook stands on the precipice Google inhabited just before it became a top money-maker. By taking a page from the Google playbook, and aggressively marketing — and explaining — its power to influence buying decisions, Facebook ads could become as essential to 21st Century marketing as the yellow pages were in the 20th Century.
E-Commerce – Stop Sending Customers Away
The launch of Facebook as a true e-commerce site holds immense potential as a business solution and could forever change the way we shop. Online purchases through the first three quarters of 2009 totaled $98.3 billion according to the Department of Commerce. For the majority of companies selling products online who are also engaged on Facebook, opening Facebook fully to direct e-commerce transactions will dramatically change how businesses advertise and how consumers buy goods online. Consumers and companies would flock to a Facebook storefront for one simple reason: We do everything else there. Imagine an integrated, one-click solution whereby your friends see your recent purchases (because you were incentivized by the brand to share your information) in their feed and are able to simply point, click, and purchase the same item.
With a few adjustments, companies can make timely offers of birthday gifts for friends, travel arrangements for event items, or the latest music from favorite artists –- and make the sale without forcing the user to leave Facebook or put in new login information.
Rather than driving their 350 million users away from the platform to “close the deal” with retailers and purchase the item on an external platform, Facebook could benefit financially by charging companies a percentage of sales, a fixed rate to have a storefront, or from increased advertising opportunities.
Premium Subscription Options
Finally, whether users like it or not, Facebook will do itself a long term disservice if it does not consider premium subscription options. Users (whether they are corporations or teenagers) are amenable to paying for even the simplest features and functionality, as evidenced by the success of Facebook gifts. Nothing good in life is free. It’s a stark, mature reality that Facebook (and its users) need to face in 2010. By leveraging economies of scale, Facebook can churn a sizable profit without alienating users. Would you pay one dollar a month to share higher-resolution photos or upload higher-quality or longer videos? Last month, 2.5 billion photos were uploaded to Facebook. Even if only a quarter of the site’s active users opted for premium options, this one change would generate more than $1 billion in annual revenues.
Improving advertising, developing an e-commerce platform, and adding subscription services will not only generate the revenue necessary to make the transition from highly adopted to highly profitable, it will open revenue streams — as Google did before — for the next generation of digital developments.
Creating RSS Feeds for Your Website
RSS stands for Really Simple Syndication or it's sometimes referred to as Rich Site Summary. It's an XML-based content format for distributing news, headlines, content, etc.
Most popular sites news sites and blogs provide RSS feeds for you to subscribe to. All you need is a feed reader to view its contents.
Feed readers come in all shapes and sizes these days. The Firefox browser has one built right into the Bookmarks feature. I use Google Reader.
You can also create feeds for your own website so your audience can subscribe to them. If you update your content frequently and promote the feed effectively, it can help drive more steady traffic to your website.
Advantages of Creating RSS Feeds
More Traffic
For webmasters this is an excellent way to bring repeat traffic to your site. Think about it....every time a web surfer opens their RSS reader to get the headlines for all the sites they monitor, they'll also see your site's updates.Instead of relying on them to bookmark your site and return at a later date, their RSS reader keeps your site fresh in their minds.
So when they open their reader to check the headlines for CNN, Yahoo or any other feeds they subscribe to, they'll also get the latest updates from you!
Avoid Email Spam Filters
Many webmasters are now dumping their newsletters and switching to this method of content distribution because you don't have to worry about dodging the spam filters.I don't think that RSS will completely replace email newsletters, but I can see them definitely being used as an alternative more and more.
When you send an email newsletter more than 40-50% of the people won't even receive it due to spam filters or because of the fact it gets lost in all the junk mail your subscribers receive.
With RSS feeds, you don't have to worry about that because you're not sending an email, your simply sending out a news feed for all the readers to pick up.
Export Your RSS Feed
The cool thing about these feeds is that other people can use them as content on their site. So if you have a feed that is of particular interest to another webmaster, they can post your content on their site with a simple javascript code. This is another great traffic opportunity!How to Create an RSS Feed for a Static Website
Most blog platforms create feeds automatically, but if you have a static website you'll need to create one manually.I would suggest using some type of software unless you like writing XML by hand. (Yuck!)
I use www.feedforall.com for my static websites. They have an easy-to-use feed builder that lets you create and manage all your feeds in one place.
Then once you've created your feed you have to upload the XML file to your web server. FeedForAll.com will automatically convert your feed into the XML format so you don't need to worry about additional formatting or coding.
The URL will be something like http://www.yoursite.com/yourfeed.xml. This is the link to your RSS/XML feed, and the one you'll be advertising so people can subscribe.
So any time you add a new article to your feed, that XML file is updated.
FeedForAll also has a built-in upload feature so you can upload the XML file right to your web server with their software, assuming your web host has FTP access.
Use a Blog Instead
If you don't want to buy extra software to create your RSS feed, there is another way to create one for free.You can create a free blog at Blogger.com and the RSS feed URL is automatically generated for you. This is the easiest way to go. So every time you post to your blog, the feed is updated instantly.
WordPress is another site that offers a free blog equipped with and RSS feeds. Read about creating your own blog here.
Announcing Your Feeds on Your Website
One of the easiest ways to announce your feed on your site is to use FeedBurner.com. They provide a redirect URL (address) for your feed that your audience subscribes to.The benefit is that if you move your blog and your RSS feed URL changes, you don't have to worry about losing your subscribers because the redirect URL they provide stays the same.
FeedBurner provides several methods of announcing your RSS feeds. You can display a traditional RSS button, rotate your feeds in banner-style on your web pages, etc
Automatically Import Blog Post Into Facebook Fan Page Wall
In Facebook, we will use the "Notes" application to automate blog posts importing to Facebook Fan Page.
Automatically Import Blog Posts to Facebook Fan Page
First of all, you will have to login to your Facebook Fan Page, then click "Edit Page" as shown in the picture below.Next, you will come to a page like the picture below. Then, click on "Edit Import Settings" as shown in the picture below.
After clicking on "Edit Import Settings", you will reach a page where you can paste your blog's RSS link to import your blog posts automatically to Facebook Fan Page wall. You will reach to the page as shown below.
Once you reach the page as shown in the picture above, click on "Apps" and then go to "Notes", click "Go to App". This is the apps that will do the automated import of blog posts for you.
You will reach a page as shown above, you will have to paste your blog feed URL into the text box "Web URL". Make sure you "tick" on the "By entering a URL, you represent that you have the right to permit us to reproduce this content on the Facebook site and that content is not obscene or illegal."
Then, click on "Start Importing".
Finally, you will reach a last page as shown above for confirmation purpose. Click on the "Confirm" button, then you have completed the setup.
Now, each time you update your blog with new posts, it will be automatically imported into your Facebook Fan Page and all the posts will be displayed on the Fan Page Wall. And, of course, all the fans of your Facebook Fan Page will get the notification of updates.
That is it for this tutorial.
How to Make Your Own Glowsticks
Glowsticks adorn the necks of children and adults at sporting events and other celebrations. People also use them to wave as a show of spirit at a ballgame. Glowsticks can be held or wrapped around as jewelry.While you can buy them, the following steps will demonstrate how to make your own and will allow you to make a large supply for friends if wished!
Steps
- Buy the necessary supplies listed in "Things You'll Need" below. Also read the "Tips" to see where to buy the items from.
Buy the necessary supplies listed in "Things You'll Need" below.
- Put on the protective glasses. In addition, wear gloves to protect your skin.
Put on the protective glasses.
- Combine 50 milliters of hydrogen peroxide and a liter of water in the first mixing bowl.
Combine hydrogen peroxide and a liter of water in the first mixing bowl.
- Mix the.2 grams of luminol, 4 grams of sodium carbonate, .4 grams of copper sulfate, .5 grams of ammonium carbonate and the 1 liter of water in the second bowl.
Mix the luminol, sodium carbonate, copper sulfate, ammonium carbonate and the other liter of water in the second bowl.
- Clean the containers and dry them thoroughly.
Clean the containers and dry them thoroughly.
'
- Set the correct lid next to each container. This enables you to seal the containers quickly after filling.
Set the correct lid next to each container.
- Pour equal amounts of the first solution with equal amounts of the second solution in each container and close the bottles.
Pour equal amounts of the first solution with equal amounts of the second solution in each container and close the bottles.
- Watch as the chemical compound creates a colorful glow. Take your glowsticks to the party!
Watch as the chemical compound creates a colorful glow.
- Luminol is the chemical that makes blood glow. It can be found at a scientific store, on the Internet or in a kid's spy kit.
- Sodium carbonate, ammonium carbonate, and copper sulfate pentahydrate are white powders. They can be found at a science store.
- This process can be messy. Lay down newspaper or do this in an area you can easily clean when done.
- Always wear protective glasses when working with chemical substances.
- Wear gloves. Do not touch luminol or consume it.[1]
- Children should be supervised when using glowsticks. It may be tempting for them to break the stick apart and play with or ingest the contents, which can cause serious injury.
- 2 large ceramic mixing bowls
- Plastic containers like test tubes or shampoo bottles
- 2 liters (67 fl oz) of distilled water
- 50 milliliters (1.7 fl oz) of hydrogen peroxide
- 0.2 grams of luminol (do not touch it; use the container to pour from and wear gloves)
- 4 grams of sodium carbonate
- 0.5 gram of ammonium carbonate
- 0.4 gram of copper sulfate pentahydrate
- Protective eyewear
Subscribe to:
Posts (Atom)